How To Make Stained Glass
There are two main stages in the production of a stained glass window:
1. The design of the stained glass (the artistic side)
2. The realization of the stained glass (the technical side)
QUALITIES REQUIRED:
It takes several to make a stained glass (artistic qualities, technical qualities and personal qualities)
We talk about artistic quality for the choice of the model of the stained glass, the colors, the kinds of glasses as well as the qualities of drawing.
We talk about technical quality because the realization of a stained glass requires manual talents to carry out the various stages of manufacturing of the stained glass such as: cutting glass, grinding, assembling pieces and welding.
We are talking about personal quality because making a stained glass window ultimately requires patience, skill, method and discipline.
MATERIALS AND EQUIPMENT:
Materials and equipment are required to make a stained glass window.
1. To draw and color the drawing you need lead pencils, colored pencils.
2. To cut and grind the pieces of glass you need a glass cutter, pliers with a flat head and a grinding wheel.
3. To assemble the pieces you need a square wooden board, a drawing of the stained glass, zinc borders, an iron saw, horse nails, a hammer, glass, lead rods or ribbon copper, a dispenser of copper tape (optional), a glass cutter, a cutter of lead rods and copper tape, a grinding wheel, a spatula, a vice, scissors, gloves, glasses,
4. To weld the pieces you need a metal brush, liquid to be welded, a brush, tin wire to be welded (50/50 for the holes or 60/40 for the rods), a soldering iron, rubber gloves,
5. To finish the stained glass you need a soft brush, compound liquid, soft cloths, windex, rubber gloves.
DESIGN OF A STAINED GLASS:
A. Define the project:
– Specify the type of project to be carried out. Ex: a mirror, a night light, a lamp, a sun shade …
– Choose the model to manufacture. Whether it’s a sun shade or a lamp, specify what you want in your stained glass. Ex: a flower, a bird, a sailboat …
– Take a model whose pieces are large and easy to cut
– Magnify the model with a scanner
– Make sure the model is square ie the angles are straight
– Number the pieces following the manufacturing order of the stained glass
B. Draw the model:
– Draw the model using a lead pencil
– Eliminate too small details and pieces
– Make sure all the lines of the drawing are correct
– Add lines to avoid peak pieces
– Thicken the lines with a felt pen
– Check that each piece is easy to cut in the glass
– Draw in such a way as to facilitate the manufacture of the stained glass.
C. COLORING THE DRAWING:
The coloring of the drawing is useful for the choice of glass colors. It is not always necessary to color the drawing when you have a fairly precise idea of what you want.
– Avoid having too many colors
– Choose complementary or degraded colors
– Ensure harmony and balance of colors
– Make color tests.
D. CHOOSE LENSES:
The choice of glass depends on the lighting from which the window will benefit: natural sunlight or artificial lighting. Antique glass shines brightly in direct sunlight as it becomes bland and lifeless in artificial light. As for opaque glasses, they diffuse light and shine under artificial lighting.
As it is very difficult to choose all the colors in advance, we first select the background color, because it is this which will give the shine in which the whole set will bathe.
1. Choose glasses that are easy to cut
2. Check the colors in daylight
3. Avoid glasses that are too thick or too wavy
4. Avoid too many colors
5. Avoid too pale or pastel colors
6. Use complementary colors (dark green, light green)
7. Standardize colors and types of glass.
E. DRAW THE OPAQUE PIECES:
The pieces are drawn when the glass is opaque to facilitate the cutting of the glass.
1. Choose the right side of the glass
2. Use the drawing to draw the pieces of glass
3. Draw the pieces to facilitate cutting the glass
4. Number the pieces of the glass
5. Check that the colors complement each other as well as the lines of the glass.
F. REALIZATION OF A STAINED GLASS:
The second part of the production of a stained glass emphasizes the technical side. It includes the following steps
A. Prepare the material:
– Prepare and clean the wooden board
– Make sure you have all the required equipment
– Prepare the grinding wheel by removing the grid cover, putting water up to the line indicated on the circle in the center of the grinding wheel, adding an oil cap, replacing the cover, making sure that the sponge is wet and touches the grinding wheel
Attention, if the wheel is white it is either that the sponge does not touch enough on the wheel or that there is not enough water
If the wheel descends, reassemble it with the screw being careful that the screw is on the flat side of the stick of the wheel
Those who do not wear glasses, put on protective glasses.
B. Cut the glass:
– Use a good glass cutter
– Take the glass cutter securely
– Do not weigh too much on the glass cutter
– Cut so as to hear a noise in the glass
– Separate the pieces with the flat head pliers
D. Grind the pieces of glass:
– Use the grinding wheel to remove the roughness of the pieces
– Finalize the pieces of glass
E. ASSEMBLE THE PIECES
1. With the lead rod
– Use a wooden board of sufficient size to place the drawing
– Place the drawing on the wooden board
– Keep a space for the zinc border
– Glue the drawing on the wooden board
– Cut the zinc border using an iron saw and the vice according to the size of the drawing making sure that it is not too short
– Place the zinc border on the left and bottom, along the wooden frame
– Use horse nails to hold the zinc borders and pieces of glass
– Start cutting the glass with the pieces at the bottom left of the drawing
– Before cutting and grinding the piece, check that it fits well with the pieces in place by placing the piece on the lead rod.
– Cut and grind one piece at a time and one side at a time. Do not grind too much, at first.
– Check often if the piece fits well with the lead rods and other pieces
– Cut the lead rods taking into account the lines of the drawing. Do not cut the lead rods too short, at first.
– Use the spatula to adjust the lead rods between the pieces.
– Move the other pieces as needed to place a new piece.
– Accept to go back. Do not go too fast, the end of the assembly is sometimes twice as long as the start.
– Add the other zinc borders when the pieces are assembled.
2.With copper tape:
– Clean the pieces of glass
– Coat the pieces with copper tape using the tape dispenser.
– Make sure the ribbon is well glued using the spatula
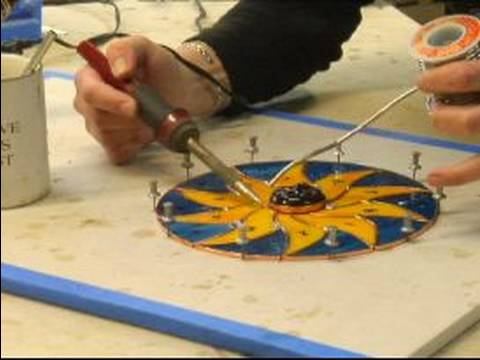
F. WELDING THE PIECES
The pieces of glass can be soldered with lead rods or with copper tape.
1. Soldering with lead rods
– Brush the lead rods and the zinc rods with steel wool or a steel brush
– Spread a little soldering liquid on the lead and zinc rods. (Avoid the gel liquid because it is more difficult to apply)
– First solder the joints of the lead rods with a little tin
– Plug the holes with lead pellets
– Tin all the lead rods in leu, giving the appearance of old stained glass, resuming welding if necessary.
– Solder both sides of the stained glass
– Solder the hooks for the frames
2.Welding with copper tape
– Spread the liquid to be welded first at certain points on the copper ribbons to attach the pieces then on all the copper ribbons
– Take the soldering iron and apply a little tin on the tip of the iron
– Press the iron flat and slide it over the copper ribbons
– Solder both sides of the stained glass
– Apply a second solder on the copper ribbons to give them a roundness
G. FINISH THE STAINED GLASS:
1. Clean the surface with dish soap and a brush in warm water (do not use windex)
2. Remove the aspirations
3. Rub with a damp cloth and compound
4. Polish with a dry cloth.